
Quick Start Guide
RadarLab Studio is weatherTAP's brand new broadcasting software. It's a tool which lets you livestream weather radar (and much more) to websites like Facebook, YouTube, and Twitch.tv. The software is still in beta, but in its current state all of the core functionality is available.
The setup guide is split into 3 parts, each surrounding a specific streaming service:
Misc. information:
Facebook Setup Guide
In order to livestream on Facebook, first log into your account and click on "Live Video" at the top of your timeline.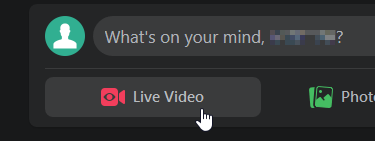
Next, in the "Get Started" section, select "Use Stream Key".
Once that's done, copy your "stream key". This is used to connect yourself with Facebook's streaming servers.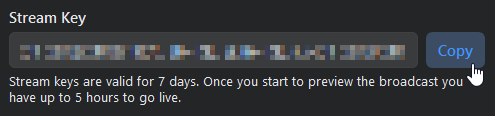
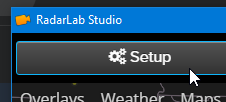
Now, in RadarLab Studio, click "Setup" in the top left corner and set your streaming platform to Facebook.
1.
2.
Lastly, paste your stream key into "Stream Key" textbox.
3.
Hit "Save Changes", close the settings menu, and you're now able to start a broadcast!
Recommended:
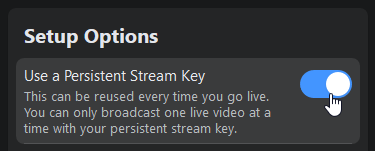
Facebook lets you use a "persistent stream key", which is basically a single stream key you can use for every livestream you do. This means that if you only plan on broadcasting on Facebook, you only have to set this up once.
YouTube Setup Guide
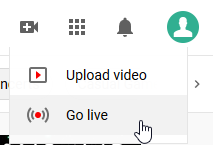
To livestream on YouTube, go to your YouTube homepage and click the "create" button (a camera with a + sign on it), which will open up a drop-down menu. In this menu, click "Go live" and you will be taken to the livestream manager.
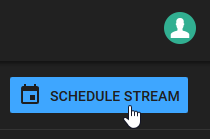
Once you're in the livestream manager, click "Schedule Stream" in the top right.
This should bring up the "New stream" window. From here you can fill out some information about your livestream, the most important step here is picking a time to schedule it. By default it'll give you the closest 5 minute interval.
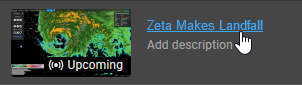
Next, click on your stream as it appears in the "Upcoming" list.
You will be taken to a page containing all your livestream controls. Here, you'll want to go to the "Stream settings" tab and copy your stream key.
Head back to RadarLab Studio, click "Setup" in the top left, and set your streaming platform to YouTube. Next, in the "Stream Key" section, paste in your stream key.
1.
2.
Lastly, paste your stream key into "Stream Key" textbox.
3.
Hit "Save Changes", close the settings menu, and you're now able to start a broadcast!
Twitch Setup Guide
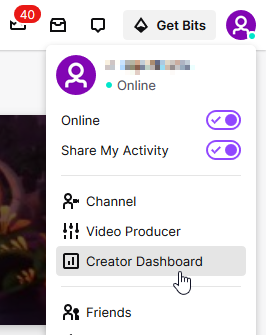
Log into your Twitch.tv account and click on your profile picture in the top right. Navigate to the "Creator Dashboard".
Next, in the left sidebar, go to Settings > Stream.
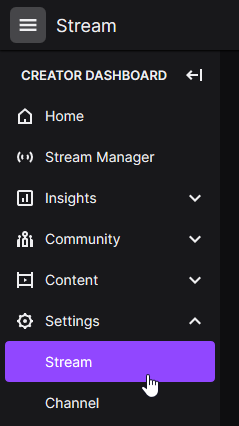
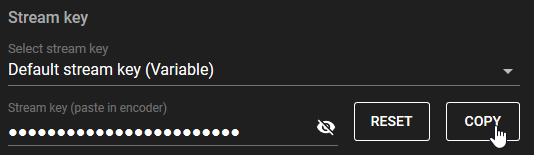
Under "Stream Key & Preferences", copy your "Primary Stream Key".

Head back to RadarLab Studio, click "Setup" in the top left, and set your streaming platform to Twitch. Next, in the "Stream Key" section, paste in your stream key.
1.
2.
Lastly, paste your stream key into "Stream Key" textbox.
3.
Hit "Save Changes", close the settings menu, and you're now able to start a broadcast!
To edit your stream information, go back to the left sidebar on Twitch and navigate to "Stream Manager".

Webcam Setup
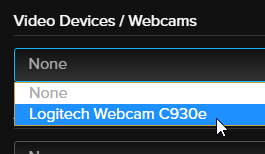
Setting up a webcam in RadarLab Studio is very simple. Go to the setup menu, and in the top right underneath "Video Devices / Webcams", select your device. Make sure no other programs are using it (e.g. Skype, Zoom, etc.)
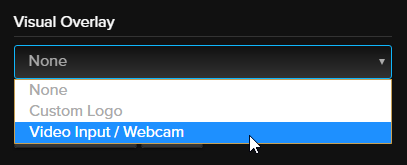
Once that's done, select "Video Input / Webcam" in the "Visual Overlay" dropdown menu, and you're all set.
Import a Custom Logo
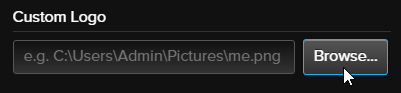
Alternatively, you can also add a custom logo to your livestream. To do this, go to the setup menu, and towards the left underneath "Custom Logo", click "Browse..." to open up a menu in which you can select your logo. The logo image must be a .gif, .png, or .jpg.
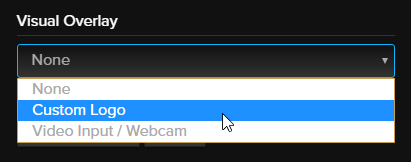
Make sure to select "Custom Logo" in the "Visual Overlay" dropdown menu towards the bottom left of the setup menu.
After that, you're good to go!
Microphone Setup
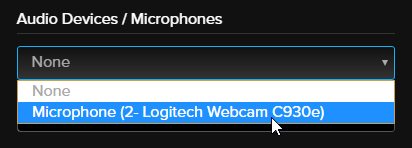
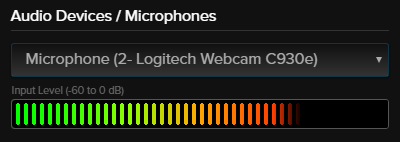
To use a microphone in RadarLab Studio, go to the setup menu and select your device underneath the "Audio Devices / Microphones" dropdown.
If it's working properly, you should see a colorful volume meter monitoring your voice.
Sketch Feature
Another feature RadarLab Studio offers is the ability to sketch over your RadarLab Scene. This allows you to clearly display where a storm may form or where a storm may be headed, highlight the areas most at risk, and more.
To enable this feature, click the "Sketch...→" button in the top toolbar.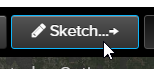
When you're done, press the same button (where it now says "←Weather") again to regain control of RadarLab.
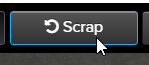
If you're done sketching or you've made a mistake, just press the "Scrap" button towards the right.
Status Bar & Troubleshooting
When you encounter a problem with RadarLab Studio, all error messages are displayed in the bottom right status bar.

If all is well and the livestream has started successfully, the status bar will automatically update every second or so with new information regarding the video. This includes the amount of time the stream has been active, the current bitrate, the quality of the stream, and the average FPS (frames per second) of the stream.

Common Problems
- Bad stream key: This will print out an error like the image above. The fix is to verify that the stream key was copied and pasted correctly. The message that comes with this error may also show up when a streaming server goes down, so we suggest checking your streaming service's website for the current RTMP server status if you're still experiencing issues..
- Webcam already in use: This can happen if the webcam is being used by another program such as Skype. To start a livestream with a webcam using RadarLab Studio, it is recommended that you close any programs you will not need during the stream.
- Lost internet connection: To keep a stream going for long periods of time, it's recommended that you have a stable internet connection with a minimum upload speed of 2mbps. If you're not sure of your internet speed, you can use public sites like speedtest.net to perform a connection test.
- Windows SmartScreen warnings: These can show up on certain beta copies of the software. It means you're using an unsigned build. As long as your copy came from weatherTAP and only from weatherTAP, you shouldn't have into any issues running these test builds. To discard the warning, press "More info" on the SmartScreen dialog and select "Run anyway".
Subscriber Beta Information
This weatherTAP feature is available to all subscribers of the service at no extra charge. Being a beta release, we're always on the lookout for potential features and improvements. If there's anything you would like to see, by all means feel free to contact us and we will happily forward your suggestions to our product development team.
Minimum System Requirements
- Microsoft Windows 10
- 4 GB RAM
- Intel i5-2000 series or AMD FX series CPU (2-4+ cores preferred)
- 2mbps upload speed
- Dedicated graphics device
- 1080p primary display
Not sure what your upload speed is? We recommend using speedtest.net before starting a stream to check your connection.
Support for macOS and Linux
Currently, RadarLab Studio does not support macOS and Linux. There are plans to add support for these platforms in the near future.